

Expansion microscopy
Microscopy is all about making the invisible visible. However, many subcellular structures are just too small or densely packed to be resolved by diffraction-limited light microscopes. The quest to overcome this limitation has focused on improving microscopes to supercharge their magnification and resolution capabilities. Expansion microscopy (ExM) is a notable exception. Turning attention to the specimen rather than the instrument, ExM achieves high-resolution images via a chemical rather than optical approach. Preserved specimens are physically enlarged within a swellable hydrogel to allow 3D nano-imaging using conventional microscopes. Tuning the sample may sound tempting, but it comes with some relevant drawbacks.
bigger samples for better resolution
So, how does ExM stack up to superresolution microscopy?
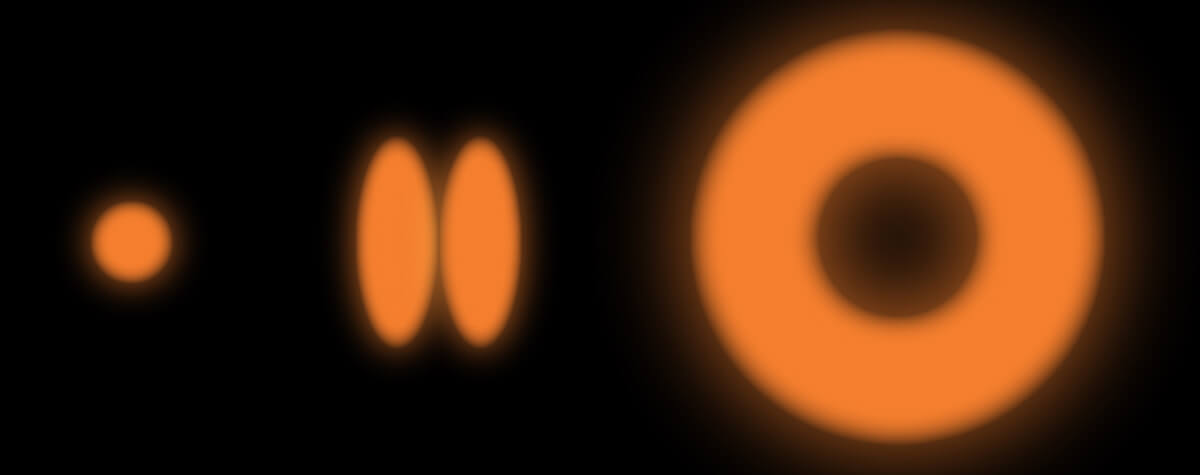
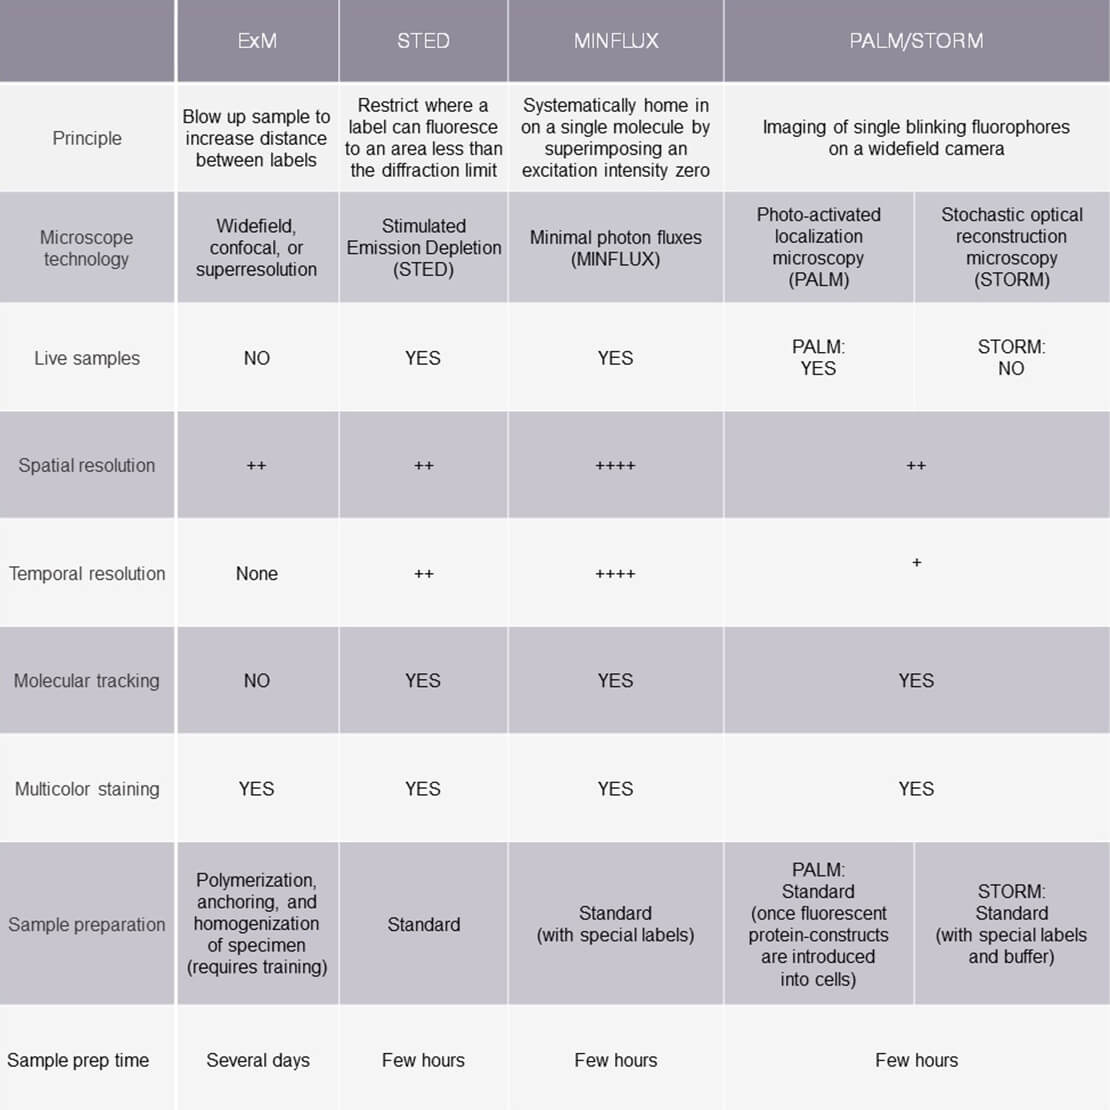
Remember that resolution is the power to distinguish two closely positioned points. In the case of ExM and superresolution methods like STED, PALM/STORM, and MINLFUX, those points are fluorescent labels that cluster at heterogeneously spaced structures in relevant areas of a sample. Each method applies a different principle to resolve this crowding. Table 1 provides an overview of how these three methods compare along different parameters.
Let’s delve a bit deeper into ExM to explore how it works and what it can and cannot do.
Blowing up specimens to see more
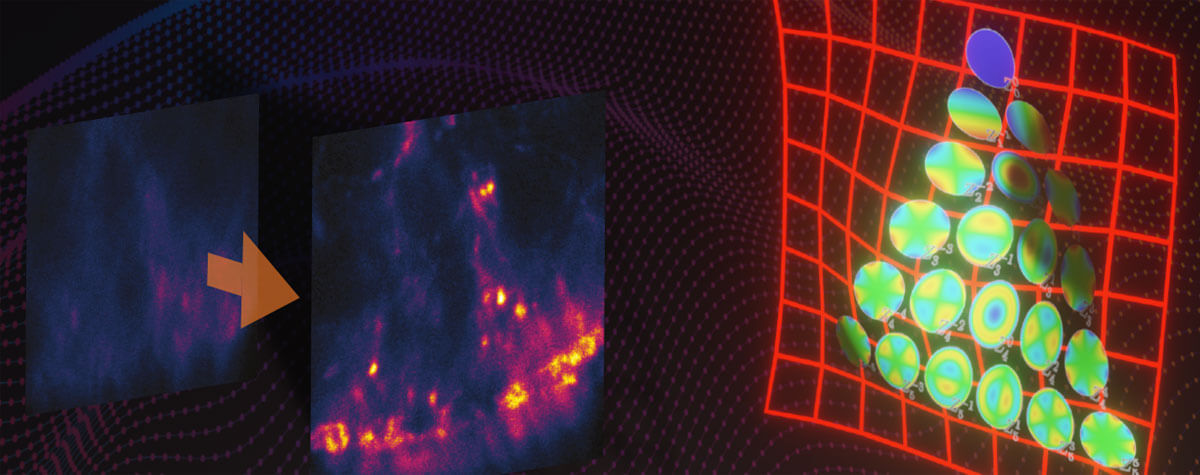
In ExM, the specimen is embedded in a hydrogel composed of a dense matrix of cross-linked polymers. The nanometer-scale polymers form a fine mesh far below the size scale of cells, wrapping around and traversing between biomolecules. Upon adding water, the hydrogel vastly expands, pulling apart molecules. However, the polymer mesh preserves the relative molecular organization. That is, the expansion is isotropic, at least under ideal circumstances and up to a certain limit (see below). As an analogy, think of drawing a picture on a lab glove and then inflating it (who hasn’t done this?). The ink particles move apart and the picture becomes larger (Fig. 1).
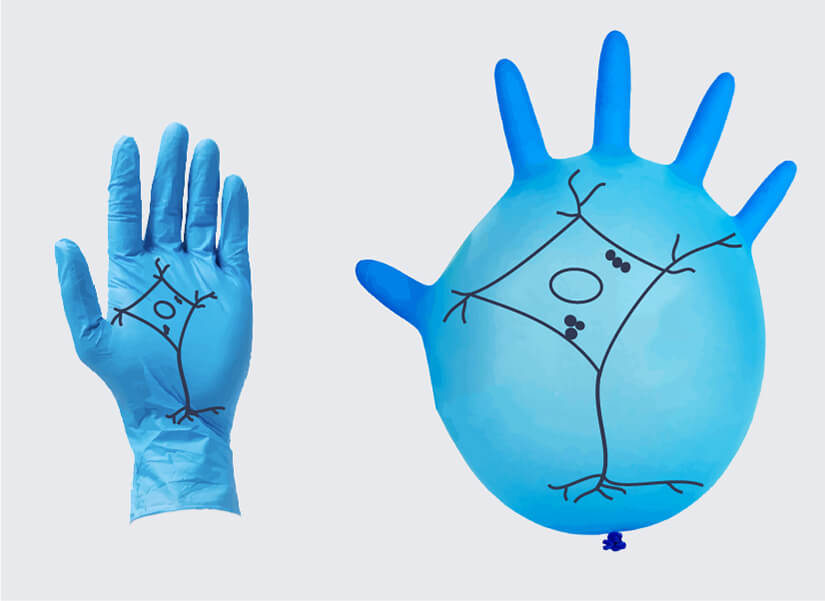
Figure 1: Akin to drawing an image on a lab glove and then inflating it, the hydrogel matrix used for ExM imaging expands a sample but (ideally) preserves the spatial relationships between molecules. However, uneven expansion is an issue and may result in a distorted image.
The expansion protocol involves more steps than “just add water”. To date, different forms of ExM have been developed to address different imaging needs, but all follow a basic workflow. The specimen is first fixed to eliminate variation and degradation from enzyme activity and tissue decay. Through a series of reagent treatments, cells in the sample are permeabilized and embedded in the hydrogel while biomolecules are anchored to the polymers. The polymer-embedded sample is then enzymatically or mechanically digested to break up macromolecular structures prior to expansion with water (Fig. 2). Fluorescent labels for visualization can be added before or after expansion.

Figure 2: General workflow for ExM sample preparation.
Details of the protocol vary by application. In protein-retention expansion microscopy (ProExM), specimen proteins are anchored to the polymer, whereas expansion fluorescent in situ hybridization (ExFISH) anchors nucleic acid molecules. Iterative expansion microscopy (iExM) augments expansion by applying a second swellable hydrogel to the space opened by a first expansion. Each ExM variation achieves a different expansion factor and, thus, resolution. An upper bound lies currently with iExM, where an effective resolution down to 15 nm is attainable using a 300 nm diffraction-limited objective lens.
New techniques for ExM continue to emerge. For example, click-ExM integrates click labeling with biotin and staining with fluorescently labeled streptavidin to allow visualizing lipids, glycans, and other small molecules in addition to proteins, DNA, and RNA. A development called Magnify eliminates the anchoring step in sample preparation with a gel that retains nucleic acids, proteins, and lipids universally.
The plethora of ExM protocol variations shows: it’s all somewhat complicated.
Clear, inexpensive, and platform-agnostic
ExM promises to overcome many practical and scientific hurdles of superresolution techniques. To begin, ExM uses inexpensive and common reagents. ExM is also instrument agnostic. By increasing the space between biomolecules to the point where even a diffraction-limited microscope can discriminate them, ExM works on any microscope and shifts a range of commonly used imaging techniques into the realm of superresolution. Thus, ExM can be integrated into existing laboratory infrastructures with a minor financial investment.
Second, the expanded specimen is a more accessible imaging environment. Expanded with water, samples also become completely transparent, which eases and accelerates volumetric imaging. Finally, when staining samples after expansion, the augmented space accommodates more labeling molecules, thereby improving multiplexing capacity.
Not all that looks easy is easy
While a “superresolution technique” using common reagents and conventional microscopes sounds great, there is, of course, a catch – in fact, there is more than one.
The obvious one is ExM’s incompatibility with live-cell imaging. Cells and tissues must be fixed to withstand the permeabilization, polymerization, and expansion process, not to mention that dragging apart biomolecules means that they won’t interact anymore. The same expansion also leads to a diluted signal – often up to 50% – as labels added prior to expansion end up occupying a wider space or may be damaged during separation.
At first glance, sample preparation for ExM looks straightforward. However, it is a finicky multi-step process that can take up to 4 days, which substantially lowers sample throughput. Moreover, preparing samples for ExM requires a trained hand to carry out reliably. Successful expansion depends on an even, mesh-like distribution of the polymer chains between and around biomolecules and a uniform homogenization of the specimen, so that no structure resists expansion. That proficiency comes only from experience. In the hand of novices, expansion is rarely uniform in all four directions, which introduces distortions in a final image. Especially in iExM, a 5–10 nm error caused by anisotropic expansion makes very precise nanoscale imaging impossible. In fact, expansion may vary between organelles within a single cell or even between sub-structures of the same organelle.1
To visualize the problem of anisotropic expansion, it helps to recall the above example of the picture drawn on a lab glove: the lab glove does not expand evenly when inflated, and those parts of the picture close to the fingers and the opening will be enlarged less than the parts in the middle of the glove.
Hence, validating isotropic expansion is mandatory in ExM and the possibility of distortions should always be kept in mind when analyzing ExM images.
Such problems are unknown to superresolution methods like for example STED. As STED relies on pure physics, the generated raw data is final and mistakes in the imaging process result in no image at all.
Handling ExM specimens is another issue. The transparent, unstable, and jelly-like sample is difficult to manipulate and must be protected against evaporation. That consistency and high water content also make it impossible to add anti-bleaching agents or use anything but water objectives. Then there is the sample size: ExM samples are large, which makes transfer from, for instance, a petri dish to the microscope slide challenging. Also, a larger sample depth means that, in order to image the same structure, you have to image deeper inside the sample than you would need to in a non-expanded specimen, and the difference may easily be 10-fold. Index mismatches have a stronger effect; deeper imaging equals more aberrations and in consequence lower signal and resolution, and the working distance of the objective lens becomes an issue, as well.
Expand your specimen or expand your options?
ExM is an imaging solution that is potentially accessible to any lab with conventional microscopes. It comes, however, with a lengthy onboarding as the operator learns the “art” of evenly and reliably expanding samples. Moving from confocal to expansion is much more challenging than moving from confocal to, for example, STED. Furthermore, expansion excludes the option of live-cell imaging or tracking the movement and interactions that define life.
Investing instead in a super-resolution technology like STED or MINFLUX is the optimal choice for routine work. Sample preparation with a low risk of distortion, live specimen compatibility, intuitive handling, and the temporal resolution to see life in action are just some of the advantages that make technologies like STED and MINFLUX attractive. And acquiring superresolution microscopy doesn’t have to break the bank. STEDYCON, a full confocal and STED microscope the size of a shoebox, fits on every microscope frame with a camera port and is the very definition of ease-of-use at an affordable price.
So, how will you expand into superresolution microscopy?
1 Büttner M, Lagerholm CB, Waithe D, Galiani S, Schliebs W, Erdmann R, Eggeling C, Reglinski K. Challenges of Using Expansion Microscopy for Super-resolved Imaging of Cellular Organelles. Chembiochem. 2021 Feb 15;22(4):686-693. doi: 10.1002/cbic.202000571.