

Where the tiny becomes mighty
Microscopes open a gateway to the unseen, revealing the intricate details of life at the cellular and sub-cellular levels. For centuries, conventional light microscopy was and continues to be the workhorse of labs to visualize cells and cellular details. But the advent of electron microscopy brought about a new level of detail, diving down to single nuclear pores or the DNA double helix, measuring just 2 nm across. A single but profound difference sets these two microscopes apart: the beam applied to the sample. This simple fact shapes each microscope’s components, operation, and applications. Let’s take a closer look and compare a conventional light microscope to an electron microscope.
light vs electron microscopy
From light waves to electron beams – how both techniques work
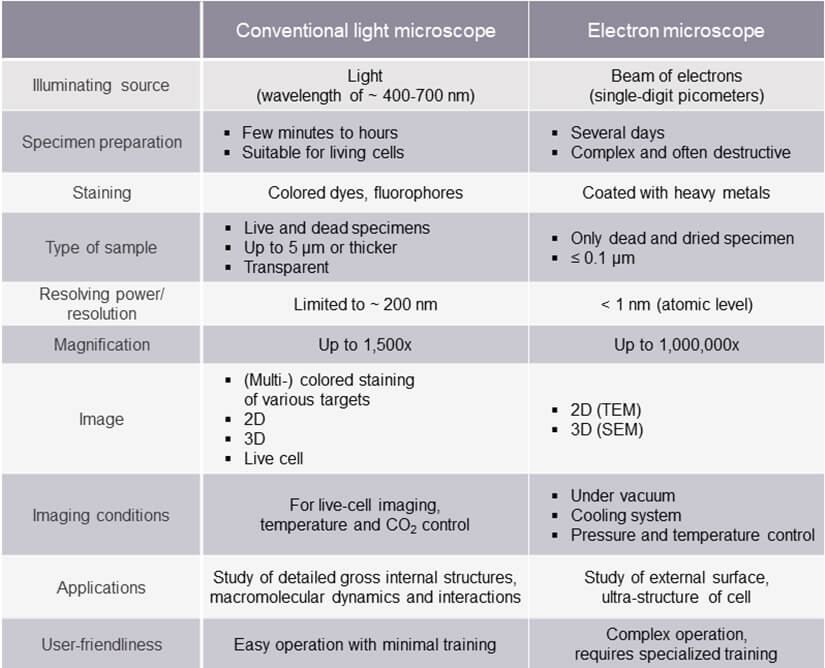
A conventional light microscope, also known as an optical microscope, is a versatile and widely available tool that uses light at 400-700 nm wavelength to illuminate a specimen. The interaction of visible light with the biological specimen leads to absorption, transmission, or reflection, and the resulting image is magnified by a combination of objective and eyepiece lenses. Optical microscopes vary in layout depending on the application, but the basic setup includes a condenser to focus light on a specimen, plus an objective lens and eyepieces for magnification (Fig. 1). Various types, such as dark-field and fluorescence microscopes, offer specialized capabilities for studying specific cellular structures.
MINFLUX is the spearhead of light microscopy today. With a resolving power down to a few nanometers, it penetrates into the realm previously reserved for electron microscopy. What’s more, in contrast to electron microscopy, MINFLUX may even be used to examine living samples and molecular dynamics (see below).
But let’s first take a look at how an electron microscope works. An electron microscope uses a beam of electrons to unveil specimen details. Operating in a vacuum, it employs magnetic lenses – a condenser, objective, and projection lens – to focus and magnify the electron beam and capture specimen information (Fig. 1). The image is generated by the transmission or scattering of electrons. In transmission electron microscopy (TEM), electrons pierce through specimens and leave details on fluorescent screens. Scanning electron microscopy (SEM) crafts 3D-like images by scanning a specimen’s surface with a focused electron beam.
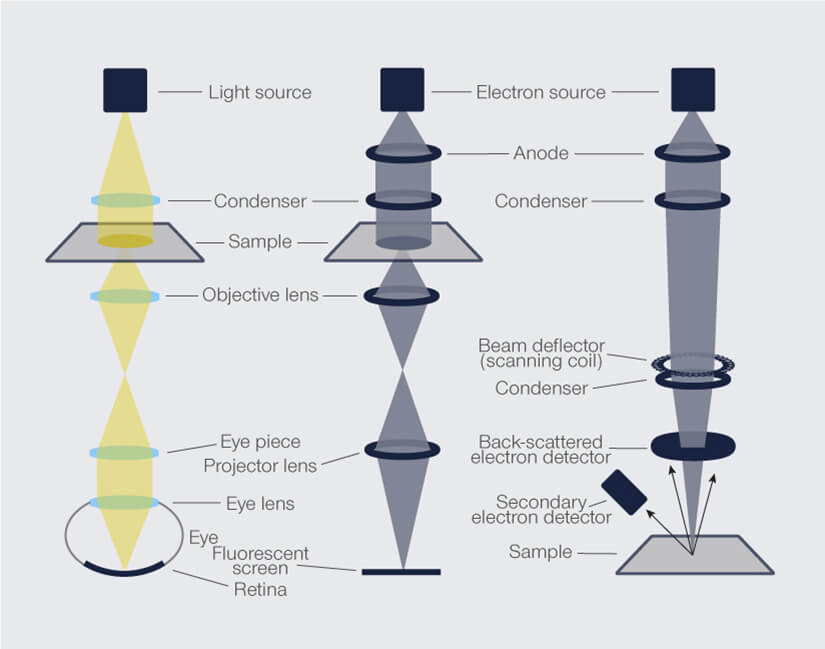
Figure 1. Setup comparison of a conventional light microscope, transmission, and scanning electron microscope.
The wave defines the resolution
Conventional optical microscopes magnify a specimen up to 1,500x. However, their resolving power is limited by the wavelength of visible light. The performance of optical lenses decays at shorter wavelengths (∼ 400 nm) and Abbe’s diffraction limit puts the resolution boundary at roughly half that wavelength. Thus, structures smaller than 200 nm laterally and 600-700 nm axially are blurred, leaving numerous subcellular structures inaccessible.
By comparison, electron microscopes offer far superior resolution, achieving a magnification of up to 1,000,000x and sub-nanometer resolution about 250 times that of a conventional light microscope. What’s the difference? The specimen is illuminated with electrons, which have a far shorter wavelength than photons. Operated at an accelerating voltage of 200 keV, an electron microscope’s illumination source has a wavelength of roughly 2.5 pm. That’s picometers. The details of viruses (250-30 nm), proteins (10 nm), and even glucose molecules (1 nm) come clearly into view. For electron microscopes, resolution is not limited by wavelength but by its electromagnetic lenses, which cannot be shaped as precisely as the optical lenses of light microscopes.
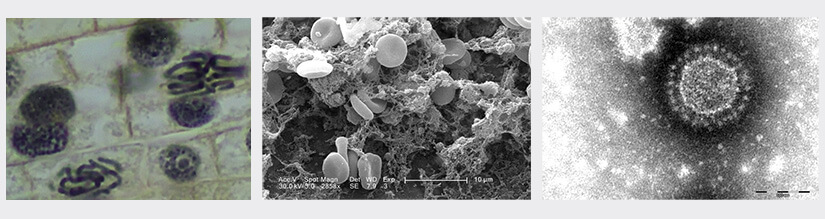
Figure 2: Examples of light microscopy, scanning electron microscopy (SEM), and transmission electron microscopy (TEM). Left: Conventional light microscopy can easily resolve cellular structures such as chromosomes in onion cells as in this image. Middle: SEM is well suited to image surfaces in great detail (here: a blood clot). Right: TEM reaches sub-nanometer resolution and can resolve e.g. details of viruses like this Porcine epidemic diarrhea virus. (Images: left: Bobjgalindo, CC license 4.0, no changes made; middle and right: public domain).
And what about live specimens?
Compared to electron microscopy, light microscopy steals the show here. You can use a variety of specimen types – living or dead, fixed or unfixed, stained or unstained, with thickness in the micrometer range. You can peer into specimens, like living cells, as they are transparent to photons. And it doesn’t take much to prepare these specimens. Staining with colored dyes or fluorophores to enhance contrast and highlight specific cellular structures is straightforward, and various colors can be used simultaneously to reveal multiple targets at once. Along with mounting on a glass slide with a coverslip, preparation is done within minutes to hours.
Electron microscopy excludes live-specimen observation. Also, marking structures of interest with colored dyes and labels, like in light microscopy, is not an option. Specimens must be ultra-thin (usually 0.1 µm or below) and undergo a series of intricate preparation steps, from fixation to dehydration and coating with heavy metals to reflect electrons before mounting on a copper grid. Preparation is labor-intensive, requires advanced skills, takes several days to complete, and makes it impossible to keep a specimen alive.
Photon vs. electron: a microscopy duel?
Both conventional light microscopy and electron microscopy have their place in science. Each unveils unique aspects of life at different scales. On the one hand, simplicity and user-friendly operation make conventional light microscopes a fundamental choice for many scientific labs. They are compact, lightweight, suitable for field use, and come at an affordable price and low maintenance costs. On the other hand, electron microscopes are far superior in magnification and sub-nanometer resolution, clearly showing the molecular world. That high resolution, however, comes with a high price tag, requires dedicated rooms and trained operators, and the imaging conditions are incompatible with live specimens. So, is there a way of getting the best of both microscopes?
Go beyond the conventional
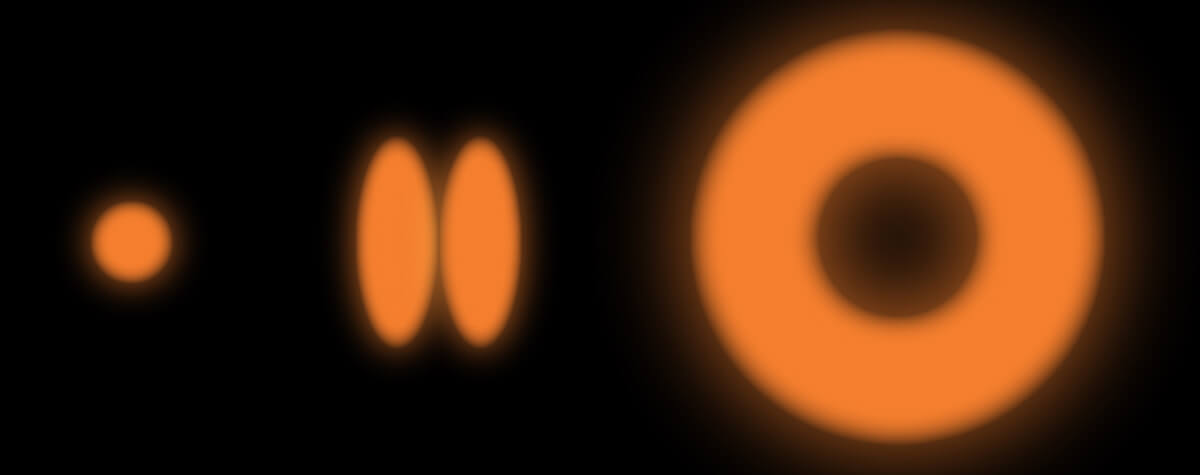
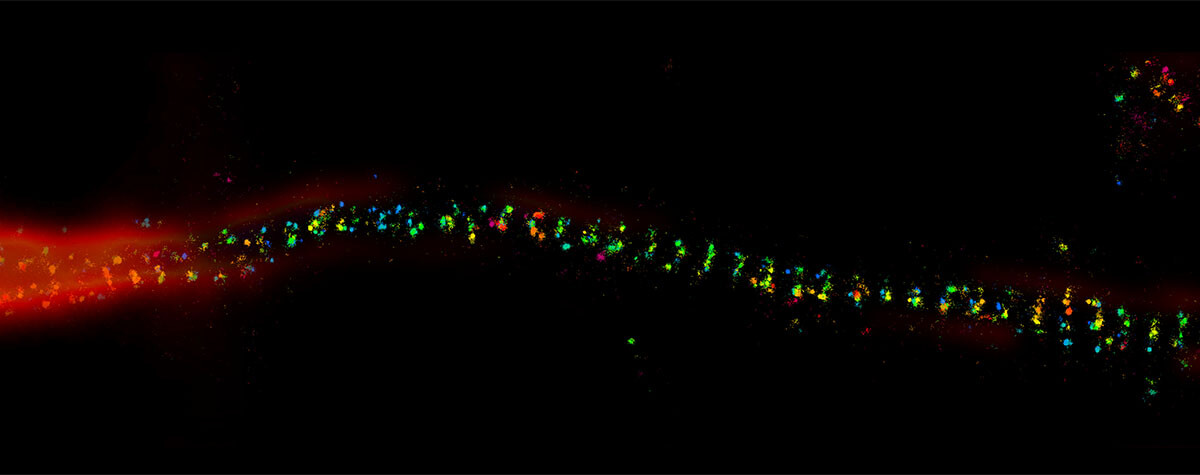
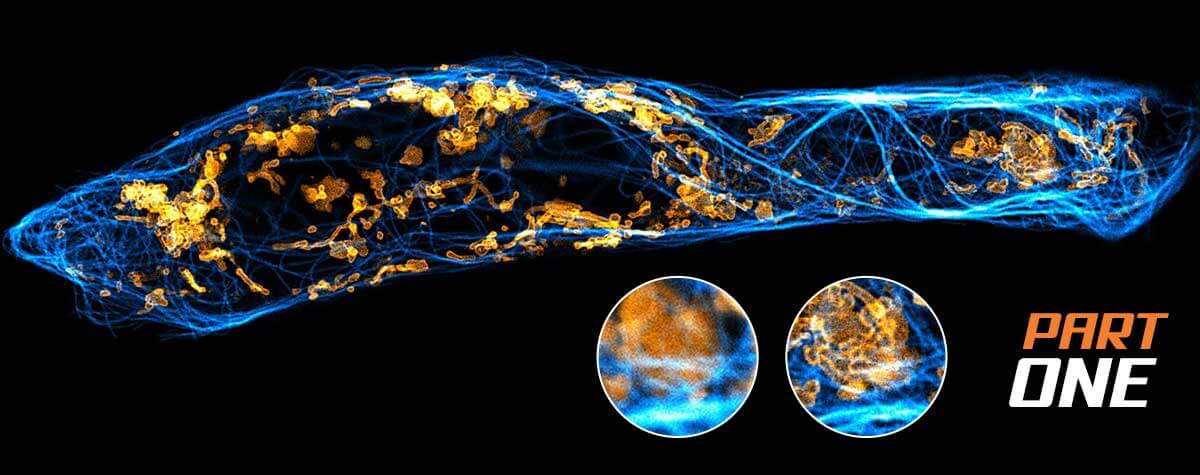
We’ve compared the electron microscope to conventional light microscopes, but today’s microscopy armory includes superresolution instruments that circumvent Abbe’s diffraction limit, revealing structures well into the nanometer range and below. MINFLUX is one instrument in particular that has pushed the boundaries of superresolution. Noteworthy is that MINFLUX steps in where the electron microscope comes to a halt: examining live specimens and investigating live molecule dynamics. Multicolored MINFLUX visualizes the two- and three-dimensional distribution of molecules within live cellular landscapes at a resolution of 1–3 nm. It has been used to image single molecules in peroxisomes, mitochondrial membranes, photoreceptors, neurons, and nuclear pores (Fig. 3). Furthermore, with a temporal resolution of less than 1 millisecond, MINFLUX also captures conformational changes of molecules, like the step-by-step movement of kinesin-1 along microtubules1,2 and the activation of the mechanosensitive ion channel PIEZO1.3
With simplified sample preparation and affordability, this advanced imaging technology is accessible and powerful. Want to know more about how MINFLUX makes the invisible visible? Dive into the details in this article.
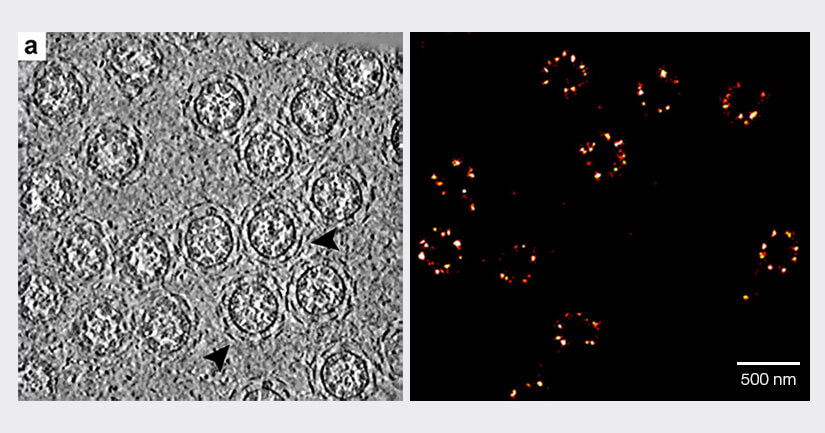
Figure 3: Both transmission electron microscopy (left) and MINFLUX light microscopy (right) reach single-digit nanometer resolution, revealing the circular architecture of nuclear pore complexes. (Left image: Zhang, Y., Li, S., Zeng, C.et al., CC license 4.0, no changes made).
1 Deguchi, T. et al. 2023. Science 379: 1010.
2 Wolff, J. O. et al. 2023. Science 379: 1004.
3 Mulhall, E. M. et al. 2023. Nature 620: 1117.