

Diving into the deep
Deep tissue imaging has become an essential tool in biological research. It allows us to peer at structures beyond a narrow sample slice and monitor complex biological interactions. Among today’s microscopy techniques, confocal and multi-photon microscopy have been instrumental in paving a path toward clearer, more detailed images from within tissues. Both techniques have advantages, but misconceptions about their utility have led to their misuse. In this article, we’ll plunge into tissue depths to reveal a gap in obtaining sharp images that RAYSHAPE – a solution for dynamic aberration correction – fills with clarity and brightness.
confocal vs multi-photon microscopy
A stroll along the z-axis: the first 20 µm
As you attempt to image deeper into a tissue specimen, different light phenomena dominate as the cause of aberrations.
Let’s start at the top. Table 1 gives you an overview of this discussion.
From a few to about 20 µm, confocal and multi-photon microscopy can produce clear images because they restrict the emission or the excitation light involved in image generation to just the focal plane (see further below). That is, they minimize contaminating signals from above or below the focal plane.
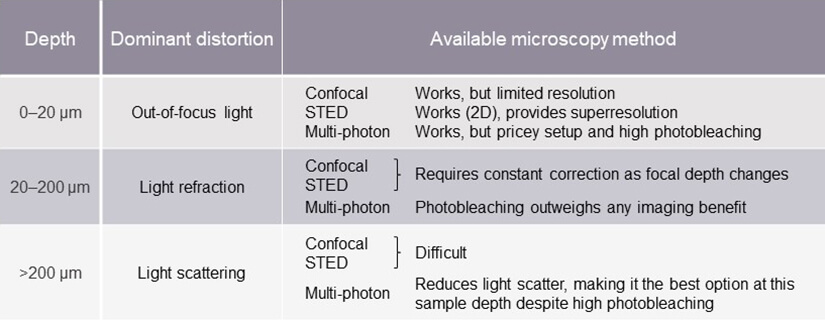
Table 1. Image distortion and limitations of different microscopy methods at various specimen depths
So, how do confocal and multi-photon microscopy work?
Illuminating depths with confocal microscopy
Confocal microscopy minimizes the amount of background fluorescence collected from the out-of-focus region of a sample by forcing emissions from fluorophores through a pinhole to filter out unfocused signals (more on optical sectioning here). This method gathers light only from sections very close to the focal plane. Then, through stacking of multiple optical sections, a three-dimensional rendition of the sample can be reconstructed.
Confocal microscopy works well with mildly scattering specimens of up to 200 µm thick. However, even with the targeted illumination of a confocal microscope, increasing imaging depth or sample density thwarts the pinhole effect: aberrations cause photons from the focal plane to miss the pinhole and photons from outside the focal plane to erroneously pass through. As a result, signal intensity decreases, and background noise increases as you image deeper.
Multi-photon microscopy goes deeper
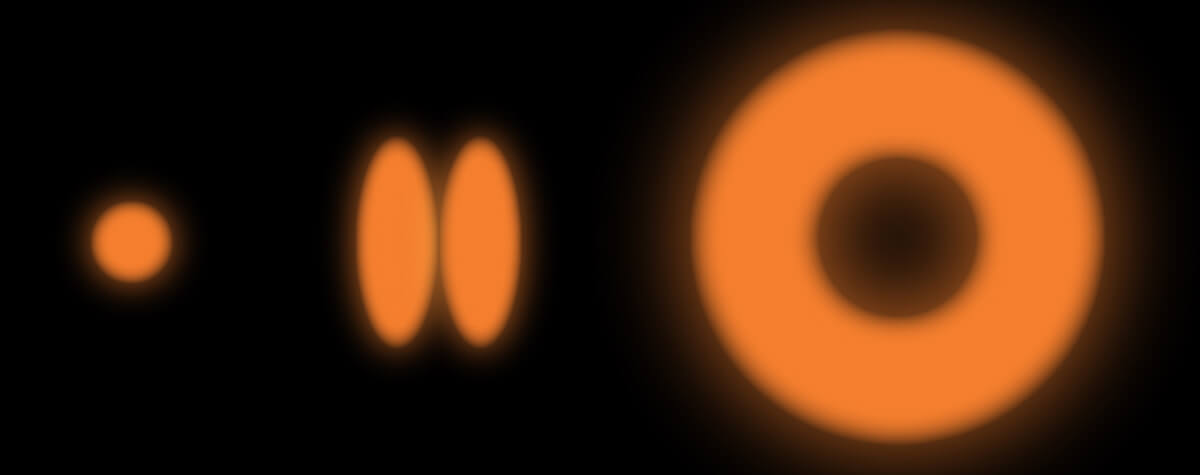
Multi-photon microscopy was developed in response to the limited tissue penetration of confocal microscopy and performs best at millimeter depths in strongly scattering samples (Fig. 1). Like the pinhole of a confocal microscope, a multi-photon microscope sharpens the detected signal to 1/z2 relative to the depth distance z. However, instead of using a pinhole to restrict emission light, a multi-photon microscope restricts fluorophore excitation to a point close to the focal plane, leaving the planes above and below unilluminated.
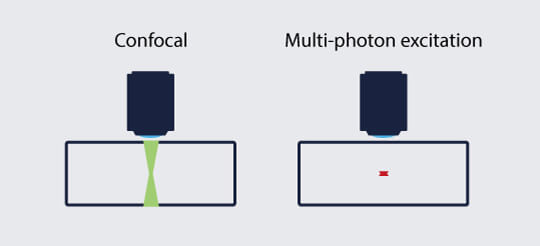
Figure 1: While in confocal microscopy fluorophores are excited also above and below the focal plane, the summed excitation of multi-photon microscopy occurs in a very narrow z range.
To do so, it excites a fluorophore with multiple low-energy photons that arrive simultaneously (within the span of a few femtoseconds) to bridge the same energy gap as a single higher-energy photon (Fig. 2). The wavelengths used in multi-photon microscopy have about half the energy of excitation beams used in confocal microscopy, tending to the red to near-infrared range, and one laser can be used to excite fluorophores with different emission wavelengths simultaneously. Optical sectioning is thus enabled by controlled excitation, and the emitted signal is projected directly and efficiently onto the system’s detector.

Figure 2: Jablonski diagram of one-photon excitation used in confocal microscopy and two-photon excitation used in two-photon microscopy. Note that the energy of excitation photons in two-photon microscopy is exactly half of that used in confocal microscopy.
Diving deeper along the z-axis: beyond 20 µm
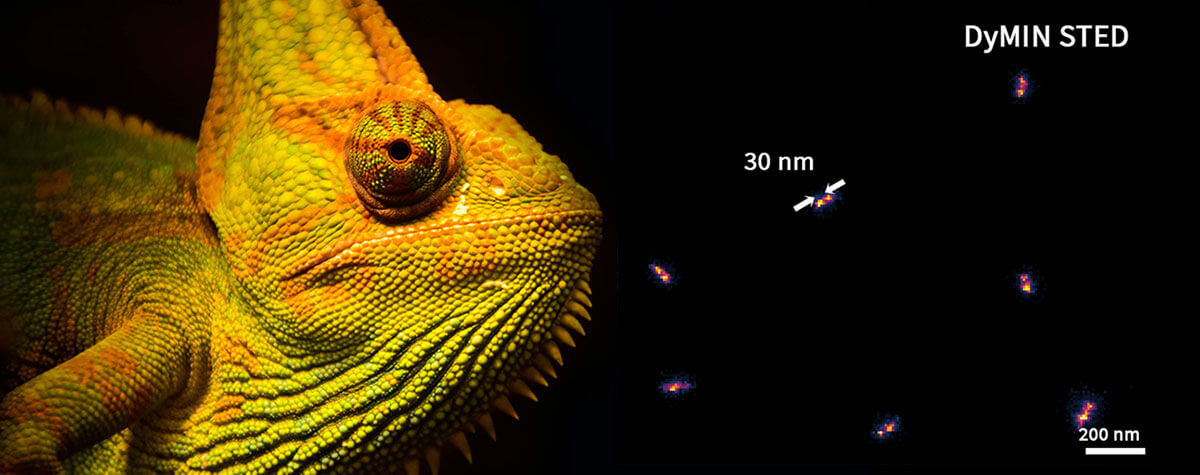
As we mentioned before, the first 20 µm of a specimen are well-served by confocal and superresolution microscopy. If sub-diffractive resolution is important, a STED microscope produces remarkably clear images. Given those two good options, investing in a multi-photon microscope is unnecessary. The high-energy, short-pulse lasers of a multi-photon setup are particularly expensive.
Deeper than 20 µm, aberrations caused by light refraction at the interface between media with different refractive indices become problematic and require correction. A correction collar on the objective of a confocal or multi-photon microscope can correct the aberrations by redirecting light. However, the collars can only be set to a fixed value that spans only a few microns on the z-axis, limiting corrections to just that depth range. Adapting the correction collar during a focus scan is not possible. Thus, this technology will never yield a z-slice image aberration-corrected from top to bottom.
With multi-photon microscopy, there is extensive photobleaching at these depths due to the high excitation doses needed to produce detectable fluorescence.1 The bleaching outweighs any benefit, so a multi-photon microscope is not an efficient solution for imaging tissues at these depths.
However, once you move deeper than 200 µm, indeterministic light scattering dominates in causing image distortion. Here, correcting refracted light no longer improves images. This is where multi-photon microscopy excels. It offers exceptional optical sectioning in scattering media, particularly in lipid-rich specimens like brain tissue, creating clear images with reduced background noise. Also, using low-energy excitation reduces scattering in deep tissues. Thus, even with high photobleaching, multi-photon microscopy becomes the method of choice for specimens from 200 µm to a couple of millimeters thick.
Filling the gap
Looking back at our stroll along the z-axis, we’re left with a noticeable gap in creating crisp, detailed images throughout a thicker specimen. Up to 20 µm, standard but robust confocal and STED microscopy get the job done. From about 200 µm to a couple of millimeters, multi-photon microscopy is the best option to handle pervasive light scattering. But in between? Are we left with the painstaking option of correcting a very limited span of 10 or maybe 20 µm in z with a correction collar objective while the rest of the image stays blurred?
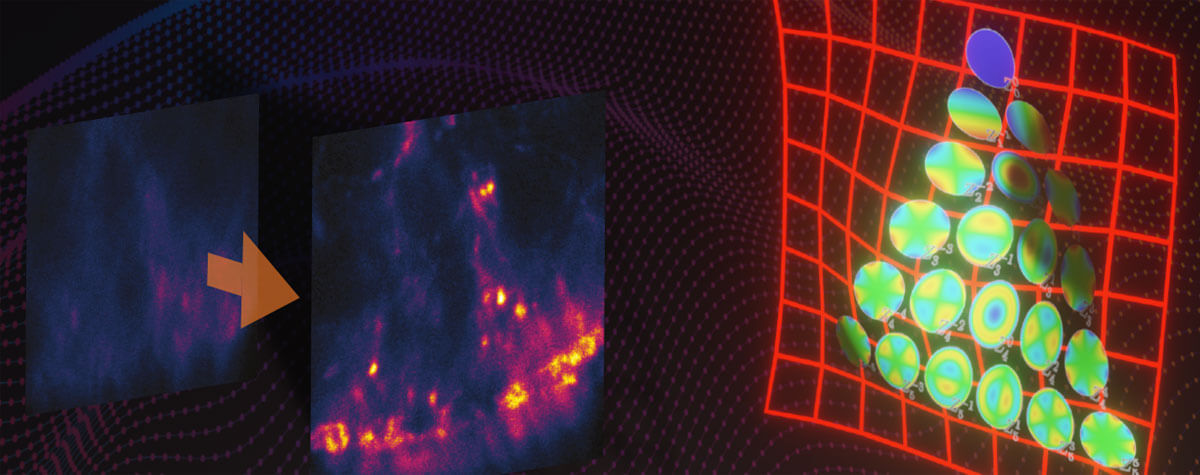
It would be great if adjustments were made by a dynamic system programmed to adapt to aberrations as you move along the z-axis and quickly redirect light accordingly.
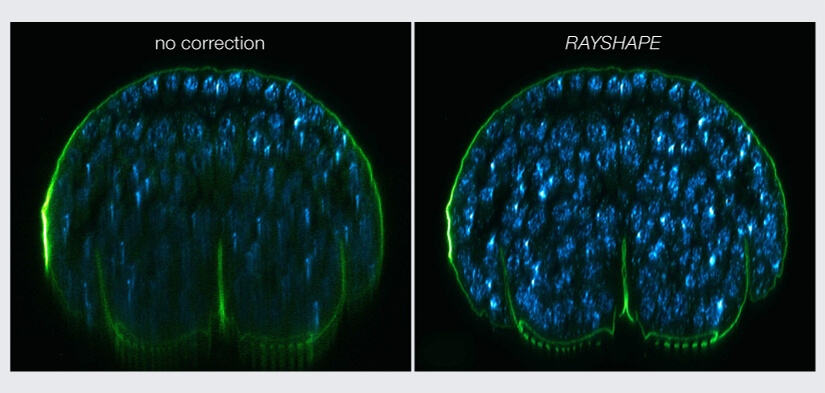
Figure 3: Example image of deep tissue imaging with RAYSHAPE. Without aberration correction, this xz-section of a stage 17 Drosophila embryo quickly becomes dark and murky with increasing imaging depth (left). RAYSHAPE with its deformable mirror dynamically compensates for aberrations during the scan as the focus moves through the sample, yielding a bright and crisp image from top to bottom (right).
From blurry to brilliant – RAYSHAPE-enhanced imaging
Equipped with RAYSHAPE, a confocal or a STED microscope produces bright, high-resolution images as you move through sample depths of a few micrometers to about 200 µm. An array of 140 autonomous actuators adjusts a deformable mirror to optimize the focus quality of the excitation beam and compensates for aberrations in the emitted light as the focal plane of the microscope moves through a specimen. Because the actuators act upon the mirror’s surface in milliseconds and with great precision, correction is dynamic, and bright and crisp images are guaranteed even in the deeper layers of the sample. This innovative solution enhances image quality and minimizes stress on the sample and dye.
So, the bottom line is: if your specimen is 200 µm thick or less, RAYSHAPE-enhanced confocal or STED microscopy brings every depth into focus. STED, of course, also delivers superresolution for outstanding detail. For specimens thicker than 200 µm and up to a few millimeters, a multi-photon microscope reduces scatter to produce clearer results, albeit at the cost of increased photobleaching.
Get perfect focus and exceptional resolution for your images.
Find out more about dynamic aberration correction with RAYSHAPE.
1 Singh, A. et al. 2015. Comparison of objective lenses for multi-photon microscopy in turbid samples. Biomedical Optics Express 6: 3113.