

Labeling Protocol for HaloTag®
With six vivid fluorescent colors to choose from, abberior gives you the flexibility to tailor your experiments to your specific research needs – whether you’re studying live-cell interactions, tracking protein dynamics, or exploring intracellular structures.
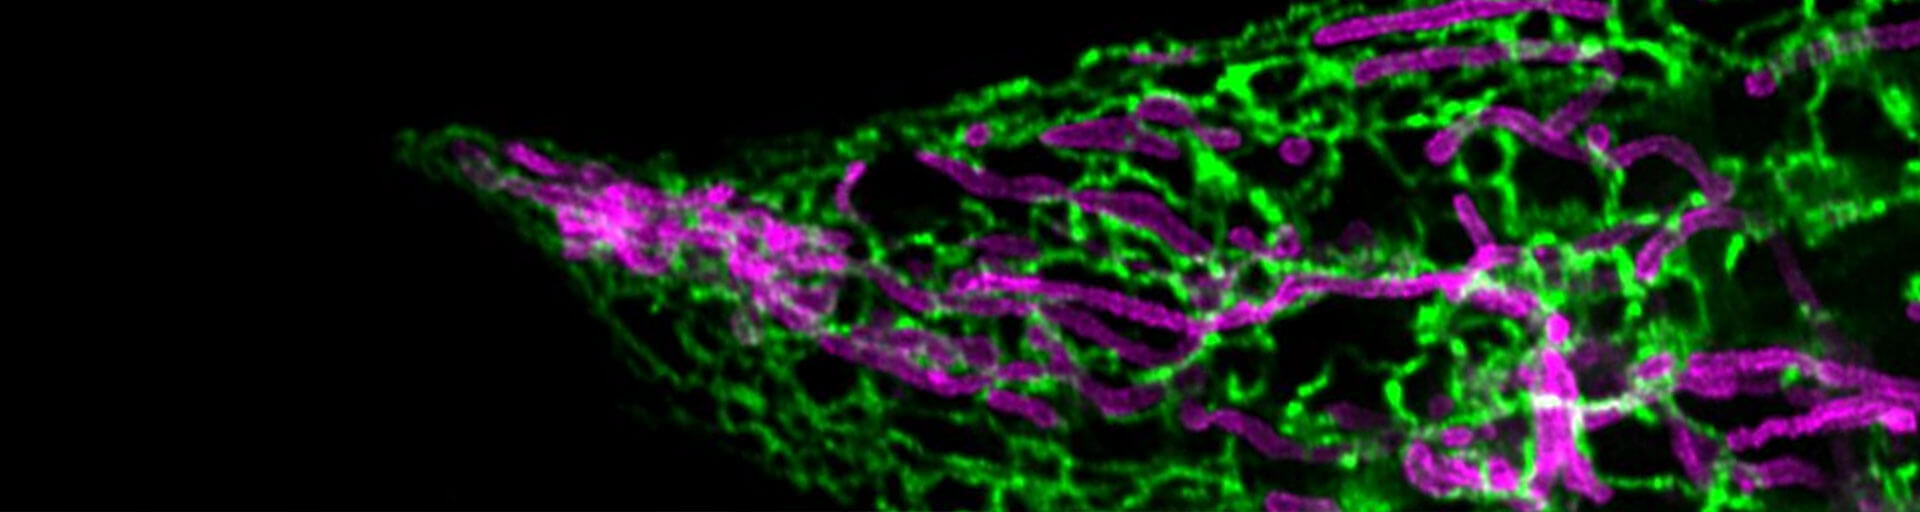
with abberior LIVE and abberior STAR dyes
Introduction
abberior offers a variety of excellent fluorescent labels with properties optimized for the labeling of biomolecules in living specimens, for spectroscopic studies and optical microscopy, particularly STED super-resolution microscopy. These unique labels combine the highest brightness and photostability with easy live-cell labeling.
Our HaloTag®1 labels can be readily used to specifically label your HaloTag® fusion proteins of interest within living cells, on cell surfaces, and within fixed cells. Due to a high affinity, the labels interact with the HaloTag® protein and form via an enzymatic reaction a covalent bond between label and protein.
Storage
HaloTag® labels are shipped freeze-dried in amounts of 30 nmol per vial. Upon arrival, the substances can be stored for up to one year at –20 °C. Shortly before the staining procedure dissolve the label in DMF or DMSO. Once dissolved the stock solutions should be kept at –20 °C, protected from light and moisture.
Note: Depending on solvent quality the shelf-life of the stock solutions might be significantly reduced compared to the substances in their solid form – even if stored at –20 °C.
Staining procedure
The procedure described below has been successfully tested with our HaloTag® LIVE and HaloTag® STAR labels in several stably and transient transfected adherent mammalian cultered cell lines expressing a HaloTag® fusion protein. This procedure has yielded consistent results in most instances but may require further optimization for particular model organisms.
Staining of targets in cultured living cells using HaloTag® LIVE labels
The seeding time should be adjusted according to the doubling time of the particular cell line. Seed cells at the desired density in a cell culture chamber or onto coverslips before labeling. Use a standard cell culture medium that is optimal for the cell line.
For transfection of the cells, please follow the instructions of the manufacturer of the transfection reagents.
Note: Cells grown in very high densities, i.e., a confluent layer, may give rise to a high labeling background.
Required reagents; not provided
- DMF or DMSO
- glass coverslips, glass-bottom dish, or similar imaging chamber with a glass thickness of ~170 µm (No. 1.5 or No. 1.5H)
Note: We do not recommend using plastic coverslips or live-cell chambers with plastic bottoms because frequently only suboptimal imaging results are achieved. If possible, coverslips with grids, gratings, or similar should be avoided, as these structures can interfere with imaging causing aberrations that degrade image quality. - Live-cell imaging medium
- Optional: Cavity slide or coverslip holder
- Optional: silicone glue (e. g. Twinsil, Picodent)
- Fluorescence microscope with live-cell incubator, suitable excitation light source and detection filter
- Gene vector and transfection reagents
Staining and imaging will take place on the same day
- Prewarm the live-cell imaging medium to the optimal temperature required to cultivate the desired cell line. In most cases, this is 37 °C.
- Please dissolve the label in DMF or DMSO to prepare a dye stock solution with a concentration of 1 mM. For a sales unit of 30 nmol, this would be 30 µl of DMF or DMSO. An evaluation sample with 2 nmol should be dissolved in 2 µl of DMF or DMSO.
- Prepare the staining solutions with final dye concentrations of 0.1 to 0.5 µM. For this, the stock solution of the abberior HaloTag® LIVE labels are further diluted in pre-warmed cell culture medium or live-cell imaging medium.
Note: The concentration required for proper labeling strongly depends on the specimen (tissue or cell). It can vary drastically between cell types, the expression rate of the protein tag, and experimental conditions..
Note: Staining solutions are not stable for extended periods of time. Therefore, it is recommended to prepare enough solution for immediate use.
Optional: The HaloTag® labels can be combined with our direct LIVE labels, SNAP-tag® labels, and with our STAR membrane labels. Simply add them to the staining solution for multicolor live-cell imaging. - Remove the cell culture medium and rinse the cells once with a pre-warmed live-cell imaging medium.
- Remove the live-cell imaging medium and add a sufficient amount of staining solution to the cells. Incubate for 30 min at optimal cell growth conditions (temperature, humidity, CO2-controlled environment).
Note: Excessive staining can lead to a high background or non-specific staining. - Remove the staining solution and wash the cells in a fresh imaging medium three times for 5 min.
- Embed the cells: If using cells grown on coverslips: Simply take the coverslip out of the imaging medium using tweezers. Place the coverslip in a coverslip holder and fill it with imaging medium. Alternatively mount the coverslip (cells facing downwards) onto a slide with a cavity filled with imaging medium.
In case of keeping/imaging cells in a cavity slide, remove any excess staining solution using tissue paper. Gently press down the coverslip to prevent it from moving. The mounted sample can be sealed using silicone glue (e. g. Twinsil, Picodent). - After staining and mounting, the samples should be imaged directly on a microscope equipped with a live-cell incubator.
Note: For live-cell imaging, cells must always be kept at ambient conditions (temperature, humidity, pH, and CO2-conditions). This is particularly important for long-term measurements.
Note: HaloTag® STAR labels can only be used to stain extracellular targets at the surface of living cells as they cannot pass the cell membrane.
Staining of targets in cultured fixed cells using HaloTag® STAR labels
The procedure described below has been successfully tested with our HaloTag® LIVE and HaloTag® STAR labels in several stably and transient transfected adherent mammalian cultered cell lines expressing a HaloTag® fusion protein. This procedure has yielded consistent results in most instances but may require further optimization for particular model organisms.
Required reagents; not provided
- Glass coverslips, glass-bottom dish, or similar imaging chamber with a glass thickness of ~ 170 µm (No. 1.5 or No 1.5H)
- DMF or DMSO
- 1x Phosphate-buffered saline pH 7.4 (PBS)
- 1% – 3% Bovine Serum Albumin + 0.1% Tween20 in PBS pH 7.4 (blocking buffer, PBT)
- 0.1% – 0.5% Triton X-100 in PBS pH 7.4 (permeabilization buffer)
- Mounting Media
Fixatives: - 2% to 8% (v/v) Formaldehyde in PBS pH 7.4 (PFA) or
- 4% (v/v) PFA + 0.1 % (v/v) Glutaraldehyde in PBS pH 7.4
All steps are carried out at room temperature in a petri dish unless stated otherwise.
- Rinse cells two times with PBS.
- Fix cells with the fixative suitable for your experiment.
Note: When using Methanol as a fixative, step 3 can be skipped. - Discard the fixation solution and extract cells with Triton X-100 for 5 to 15 min.
Note: When additional antibody labeling is desired, incubate the sample with a suitable blocking solution (e.g. PBT) for 30 min. - Wash the sample three times with PBS for 5 min.
- Take the coverslips out of the petri dish; remove excess PBT by placing the coverslip edge onto a piece of tissue paper. Transfer the coverslips into a humid chamber, cells facing upwards.
Note: If additional antibody labeling is desired, follow the protocol for indirect immunostaining and perform the incubation of primary and secondary antibodies between steps 5 and 6. Labeling HaloTag proteins can be combined with secondary antibody incubation. - Dilute HaloTag substrate in PBS to a final working concentration of 0.5 µM.
Note: The concentration required for proper labeling strongly depends on the specimen (tissue or cell). It can vary drastically between cell types, the expression rate of the protein tag, and experimental conditions. - Incubate with 0.5 µM HaloTag label in PBS or PBT for 50 min.
- Wash the sample three times with PBS for 5 min.
- Take the coverslip, remove excess PBS by placing its edge onto a piece of paper, and mount the coverslip with a suitable mounting medium.
Abbreviations
DMF N,N-Dimethylformamide
DMSO Dimethylsulfoxide
STED Stimulated Emission Depletion
PBS Phosphate-buffered saline
PFA Paraformaldehyde
PBT 1% – 3% Bovine Serum Albumin + 0.1% Tween20 in PBS
min Minute
1 HaloTag® is registered trademark of Promega Corporation.
2 This product is covered by one or more patents owned or controlled by Promega Corporation, and is intended for Research Use Only (RUO).